Sunday, July 22, 2012

Show Hidden Files and Folder

Read Indonesian Version Here
Have you ever had an empty flashdisk or some folder/file disappear when viewed using Windows Explorer, but when use "right-clicked --> Properties" there is a space that is used. Well .. if you are experiencing the same problem, do not format the flashdisk, because chances are your data is hidden.
I try to share a little knowledge to all to deal with this problem. OK just do like this.
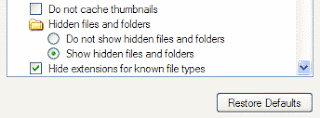
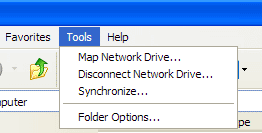
  1. Open your Windows Explore, enter to Tools --> Folder Options --> View. Then Select  Hidden files and Folders chose Show Hidden files and Folders. click OK. If this can not display the file / folder, let's do the second way.
  2. The second way is using Command Prompt. This method can be an alternative.
    • First Open Commang Prompt from run ( Window + R ) then press CMD and Enter. When the window console is out, type the name of the drive to position your flashdisk example "H:" and press Enter.
    • When you have entered on the H drive, like the picture above type attrib -r -h -s /s /d and press Enter so that it becomes as follows.
    H:\>attrib -r -h -s /s /d 
    • Wait until the H:\>_ shown, and this the simple way to show hidden file / folder.
    • Change the "-" into "+" if you want to set hide back .

***Good Luck***

Tuesday, July 10, 2012

Upgrade Codeigniter Version 2.1.0 to 2.1.2

Read Indonesian version here
A few weeks ago codeigniter was release the newest version 2.1.2. Then how do we upgrade CodeIgniter version 2.1.0 or 2.1.1 to version 2.1.2. Here are step by step.
  1. Download newest version here
  2. Set your site into offline mode
  3. Create backup from your file/folder.
  4. Replace all file in folder "system" and replace file index.php, with new file has been downloaded (codeigniter versi 2.1.2)
    Note : If you have any custom file in this folder, copy and paste it from backup.
  5. Replace file mime.php located on the config/mime.php
  6. To get support IPv6, upgrade field IP_address to 45 characters for example.
    ALTER TABLE ci_sessions Ganti IP_address IP_address varchar (45) standar '0 'NOT NULL
  7. If you have codeigniter version 2.1.1 just go to step no. 3

Friday, June 29, 2012

Create View on CodeIgniter

Read The Indonesian Version
This time the authors would like to share a little knowledge about using MVC model in CodeIgniter, for this example we try to discuss how to Create View on CodeIgniter. Before starting make sure you have the required below
  • Codeigniter versi 2.1.0 can download here
  • Create database with name "latihan"
For the first create Table "user" :
 
id (int 4) autoincrement

username (varchar 30)

access (varchar 10) 
 
and insert into table, min 2 record.

Next create file "view.php" put on application->controller
 
<?php if ( ! defined('BASEPATH')) exit('No direct script access allowed');

class View extends CI_Controller{

     function __construct(){

          parent::__construct();

          $this->load->model("crud");
     }

     function index(){

         $data['title']="View User";
         $data['header']="View User";
         $data['query']=$this->crud->view();

         $this->load->view('view',$data);

     }
?>
 
Then create file "view.php", at this time place on application->view
 
<table>

     <thead>
         <tr>
               <th>No</th>
               <th>User</th>
               <th>Access</th>
        </tr>
     </thead>

     <tbody>
         <?php
               $no = 1;
               foreach($query as $row){
         ?> 
         <tr>
               <td><?php echo $no;?></td>
               <td><?php echo $row->username;?></td>
               <td><?php echo $row->access;?></td>   
         </tr>
         <?php $no ++;      } 
         ?> 
     </tbody>

</table>

 
For the last, create file "crud.php" place it on application->model
 
<?php if ( ! defined('BASEPATH')) exit('No direct script access allowed');

class Crud extends CI_Model{

    function view_user(){
        #Table Properties
        $tabel = "user";

        #Query
        $query = $this->db->select("*")->from($tabel)->get();
        if ($query->num_rows() > 0) {
           return $query->result();
        } else {
           return array();
        }
    }
}
?> 
type on address bar www(dot)example(dot)com/index(dot)php?/view

Friday, June 8, 2012

Introduction to Codeigniter


Read The Indonesian Version
CodeIgniter is open source PHPFramework. It's free to use and manipulate as you wish. CodeIgniter uses MVC (Model View Controller) model programming. MVC is a programming concept where logic and layout are separated, so that the programmers and designers can do their job in focus. Codeigniter can download here.


Picture MVC model programming

Model Used to process the database in this case is the CRUD (Create, Read, Update, Delete)
Controller Class and / or function that will be called on the browser address bar and use to get query results from the model and then display it on the view
View Here is the WEB design area, here they are working enhance the data display query results, by adding the CSS and JS

For the begining let us give instance, how to create "Hello PHP" with controller and view.
Create a php file and rename it with c_hello.php, copy this following code
 
<?php if ( ! defined('BASEPATH')) exit('No direct script access allowed');
class C_hello extends CI_Controller{
            
   function __construct(){
                
     parent:: __construct();
                
   }
            
   function index(){ 
     $data['hello'] = "Hello PHP";
     $this->load->view('v_hello',$data);
   }
}
?>
  
Second create view and named it with v_hello.php, copy this following code
 
<?= $hello; ?>
 

** GOOD LUCK **

Friday, May 18, 2012

Create Page Number Different Format In One File Ms. Word 2007

Read The Indonesian Version
In the past when I make a proposal regarding the final project. I was looking on the internet about how to create different page number format. The first numeral and the second decimal. Finally I found the article "Menyisipkan Format Nomor Halaman yang Berbeda dalam Satu File Word 2007" on Arihdya Caesar's Blog. Here are the steps by step that I do from the reference article
  1. Open your file that will be given page number
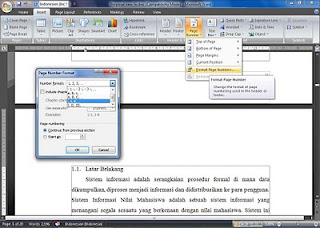
  2. Give the page with the roman numeral format on all pages "Insert->Page Number->Format Page Number", on Number Format choose the roman numeral then press OK


  3. Set Page Number depend on the Bottom of Page, actually up to you to put where depends on your taste
  4. Next specify on the number of pages will placed the decimal numbers. In this case I chose the sixth pages as the first of decimal.
  5. Place the kursor in front of the first letter, and then choose menu Page Layout->Breaks->Next Page


  6. For the next step do do step number 2, this time change Page Number Format to number 1, 2, 3,...
  7. And see the results on the sixth Page Number Format turn into decimal number.
  8. To set the "sixth" into "first" Double klick on "4"->select Page Number Format set Page Numbering->Start at fill with "1" and see the "6" turn into "1".
**GOOD LUCK**

Thursday, May 17, 2012

Create Table of Content Using Ms. Office 2007

Read The Indonesian Version

A table of contents, is a list of the parts of a book or document organized in the order in which the parts appear. The contents usually includes the titles or descriptions of the first-level headers, such as chapter titles in longer works, and often includes second-level or section titles within the chapters as well, and occasionally even third-level titles. The depth of detail in tables of contents depends on the length of the work, with longer works having less. The table of contents usually appears after the title page, copyright notices, and, in technical journals, the abstract; and before any lists of tables or figures, the foreword, and the preface. How do We make it?. We just practice how to make a clean table of contents using Tab and Ruler
  1. Prepared Ms. Office 2007
  2. Open Ms. Word, if you first use the Ms. Word, you must enable Ruler . Located at view menu and check the Ruler
  3. Next type all the points - points that will be placed in the table of contents, such as: Title of page, Abstract, Certification Sheet, Chapter I, Chapter II, etc.


  4. Block all typed list of contents and click on the ruler right on the far right position, or whatever you like. when you already have a tab mark. double click the sign.


  5. After the Tab Form appears, Change the settings as shown below


  6. When finished click OK, and use the tab to fill the page. place the cursor at the position at the end of every sentence, press Tab on the keyboard and automatically point will be formed by itself, and so will type at page where the points are located.
**Good luck**
    Ref :
    Wikipedia

    Wednesday, May 16, 2012

    DISTINCT Optimization


    DISTINCT combined with ORDER BY needs a temporary table in many cases.
    Because DISTINCT may use GROUP BY, you should be aware of how MySQL works with columns in ORDER BY or HAVING clauses that are not part of the selected columns. See Section 11.15.3, “GROUP BY and HAVING with Hidden Columns”.
    In most cases, a DISTINCT clause can be considered as a special case of GROUP BY. For example, the following two queries are equivalent:
     
    SELECT DISTINCT c1, c2, c3 FROM t1
    WHERE c1 > const;
    
    SELECT c1, c2, c3 FROM t1
    WHERE c1 > const GROUP BY c1, c2, c3;
    

    Due to this equivalence, the optimizations applicable to GROUP BY queries can be also applied to queries with a DISTINCT clause. Thus, for more details on the optimization possibilities for DISTINCT queries, see Section 7.3.1.8, “GROUP BY Optimization”.
    When combining LIMIT row_count with DISTINCT, MySQL stops as soon as it finds row_count unique rows.
    If you do not use columns from all tables named in a query, MySQL stops scanning any unused tables as soon as it finds the first match. In the following case, assuming that t1 is used before t2 (which you can check with EXPLAIN), MySQL stops reading from t2 (for any particular row in t1) when it finds the first row in t2:
     
    SELECT DISTINCT t1.a FROM t1, t2 where t1.a=t2.a;
     
    Ref :
    Dev.Mysql 

    Tuesday, May 15, 2012

    PHP Cookies

    Read the Indonesian Version

     What is a Cookie?

    A cookie is often used to identify a user. A cookie is a small file that the server embeds on the user's computer. Each time the same computer requests a page with a browser, it will send the cookie too. With PHP, you can both create and retrieve cookie values.

    How to Create a Cookie?

    The setcookie() function is used to set a cookie.
    Note: The setcookie() function must appear BEFORE the <html> tag.

    Syntax

    setcookie(name, value, expire, path, domain);

    Example 1

    In the example below, we will create a cookie named "user" and assign the value "Alex Porter" to it. We also specify that the cookie should expire after one hour:


    <?php
    setcookie("user", "Alex Porter", time()+3600);
    ?>


    <html>
    ..... 
    Note: The value of the cookie is automatically URLencoded when sending the cookie, and automatically decoded when received (to prevent URLencoding, use setrawcookie() instead).

    Example 2

    You can also set the expiration time of the cookie in another way. It may be easier than using seconds.


    <?php
    $expire=time()+60*60*24*30;
    setcookie("user", "Alex Porter", $expire);
    ?>


    <html>
    ..... 
    In the example above the expiration time is set to a month (60 sec * 60 min * 24 hours * 30 days).

    How to Retrieve a Cookie Value?

    The PHP $_COOKIE variable is used to retrieve a cookie value.

    In the example below, we retrieve the value of the cookie named "user" and display it on a page:

    <?php
    // Print a cookie
    echo $_COOKIE["user"];


    // A way to view all cookies
    print_r($_COOKIE);
    ?>
    In the following example we use the isset() function to find out if a cookie has been set:


    <html>
    <body>


    <?php
    if (isset($_COOKIE["user"]))
      echo "Welcome " . $_COOKIE["user"] . "!<br />";
    else
      echo "Welcome guest!<br />";
    ?>


    </body>
    </html>


    How to Delete a Cookie?

    When deleting a cookie you should assure that the expiration date is in the past.
    Delete example:

    <?php // set the expiration date to one hour ago setcookie("user", "", time()-3600); ?>


    What if a Browser Does NOT Support Cookies?

    If your application deals with browsers that do not support cookies, you will have to use other methods to pass information from one page to another in your application. One method is to pass the data through forms (forms and user input are described earlier in this tutorial).
    The form below passes the user input to "welcome.php" when the user clicks on the "Submit" button:


    <html>
    <body>


    <form action="welcome.php" method="post">
    Name: <input type="text" name="name" />
    Age: <input type="text" name="age" />
    <input type="submit" />
    </form>


    </body>
    </html>
    Retrieve the values in the "welcome.php" file like this: <html>
    <body>

    Welcome <?php echo $_POST["name"]; ?>.<br />
    You are <?php echo $_POST["age"]; ?> years old.

    </body>
    </html>

    Ref :

    W3school 

    Monday, May 14, 2012

    Create Trigger Syntax

    Read the Indonesian Version

     Syntax


    CREATE
        [DEFINER = { user | CURRENT_USER }]
        TRIGGER trigger_name trigger_time trigger_event
        ON tbl_name FOR EACH ROW trigger_body
    
    This statement creates a new trigger. A trigger is a named database object that is associated with a table, and that activates when a particular event occurs for the table. The trigger becomes associated with the table named tbl_name, which must refer to a permanent table. You cannot associate a trigger with a TEMPORARY table or a view. CREATE TRIGGER was added in MySQL 5.0.2.
    In MySQL 5.0 CREATE TRIGGERrequires the SUPER privilege.
    The DEFINER clause determines the security context to be used when checking access privileges at trigger activation time. It was added in MySQL 5.0.17. See later in this section for more information.
    trigger_time is the trigger action time. It can be BEFORE or AFTER to indicate that the trigger activates before or after each row to be modified.
    trigger_event indicates the kind of statement that activates the trigger. The trigger_event can be one of the following:
    It is important to understand that the trigger_event does not represent a literal type of SQL statement that activates the trigger so much as it represents a type of table operation. For example, an INSERT trigger is activated by not only INSERT statements but also LOAD DATA statements because both statements insert rows into a table.
    A potentially confusing example of this is the INSERT INTO ... ON DUPLICATE KEY UPDATE ... syntax: a BEFORE INSERT trigger will activate for every row, followed by either an AFTER INSERT trigger or both the BEFORE UPDATE and AFTER UPDATE triggers, depending on whether there was a duplicate key for the row.
    There cannot be two triggers for a given table that have the same trigger action time and event. For example, you cannot have two BEFORE UPDATE triggers for a table. But you can have a BEFORE UPDATE and a BEFORE INSERT trigger, or a BEFORE UPDATE and an AFTER UPDATE trigger.
    trigger_body is the statement to execute when the trigger activates. If you want to execute multiple statements, use the BEGIN ... END compound statement construct. This also enables you to use the same statements that are permissible within stored routines. See Section 13.6.1, “BEGIN ... END Compound-Statement Syntax”. Some statements are not permitted in triggers; see Section E.1, “Restrictions on Stored Programs”.
    You can refer to columns in the subject table (the table associated with the trigger) by using the aliases OLD and NEW. OLD.col_name refers to a column of an existing row before it is updated or deleted. NEW.col_name refers to the column of a new row to be inserted or an existing row after it is updated.
    MySQL stores the sql_mode system variable setting that is in effect at the time a trigger is created, and always executes the trigger with this setting in force, regardless of the current server SQL mode.
    Note
    Currently, cascaded foreign key actions do not activate triggers.
    The DEFINER clause specifies the MySQL account to be used when checking access privileges at trigger activation time. If a user value is given, it should be a MySQL account specified as 'user_name'@'host_name' (the same format used in the GRANT statement), CURRENT_USER, or CURRENT_USER(). The default DEFINER value is the user who executes the CREATE TRIGGER statement. This is the same as specifying DEFINER = CURRENT_USER explicitly.
    If you specify the DEFINER clause, these rules determine the legal DEFINER user values:
    • If you do not have the SUPER privilege, the only legal user value is your own account, either specified literally or by using CURRENT_USER. You cannot set the definer to some other account.
    • If you have the SUPER privilege, you can specify any syntactically legal account name. If the account does not actually exist, a warning is generated.
    • Although it is possible to create a trigger with a nonexistent DEFINER account, it is not a good idea for such triggers to be activated until the account actually does exist. Otherwise, the behavior with respect to privilege checking is undefined.
    Note: Because MySQL currently requires the SUPER privilege for the use of CREATE TRIGGER, only the second of the preceding rules applies. (MySQL 5.1.6 implements the TRIGGER privilege and requires that privilege for trigger creation, so at that point both rules come into play and SUPER is required only for specifying a DEFINER value other than your own account.)
    From MySQL 5.0.17 on, MySQL takes the DEFINER user into account when checking trigger privileges as follows:
    • At CREATE TRIGGER time, the user who issues the statement must have the SUPER privilege.
    • At trigger activation time, privileges are checked against the DEFINER user. This user must have these privileges:
      • The SUPER privilege.
      • The SELECT privilege for the subject table if references to table columns occur using OLD.col_name or NEW.col_name in the trigger definition.
      • The UPDATE privilege for the subject table if table columns are targets of SET NEW.col_name = value assignments in the trigger definition.
      • Whatever other privileges normally are required for the statements executed by the trigger.
    Before MySQL 5.0.17, DEFINER is not available and MySQL checks trigger privileges like this:
    • At CREATE TRIGGER time, the user who issues the statement must have the SUPER privilege.
    • At trigger activation time, privileges are checked against the user whose actions cause the trigger to be activated. This user must have whatever privileges normally are required for the statements executed by the trigger.
    For more information about trigger security, see Section 18.5, “Access Control for Stored Programs and Views”.
    Within a trigger, the CURRENT_USER() function returns the account used to check privileges at trigger activation time. Consistent with the privilege-checking rules just given, CURRENT_USER() returns the DEFINER user from MySQL 5.0.17 on. Before 5.0.17, CURRENT_USER() returns the user whose actions caused the trigger to be activated. For information about user auditing within triggers, see Section 6.3.8, “Auditing MySQL Account Activity”.
    If you use LOCK TABLES to lock a table that has triggers, the tables used within the trigger are also locked, as described in Section 13.3.5.2, “LOCK TABLES and Triggers”.
    Note
    Before MySQL 5.0.10, triggers cannot contain direct references to tables by name. Beginning with MySQL 5.0.10, you can write triggers such as the one named testref shown in this example:
    CREATE TABLE test1(a1 INT);
    CREATE TABLE test2(a2 INT);
    CREATE TABLE test3(a3 INT NOT NULL AUTO_INCREMENT PRIMARY KEY);
    CREATE TABLE test4(
      a4 INT NOT NULL AUTO_INCREMENT PRIMARY KEY,
      b4 INT DEFAULT 0
    );
    
    delimiter |
    
    CREATE TRIGGER testref BEFORE INSERT ON test1
      FOR EACH ROW BEGIN
        INSERT INTO test2 SET a2 = NEW.a1;
        DELETE FROM test3 WHERE a3 = NEW.a1;
        UPDATE test4 SET b4 = b4 + 1 WHERE a4 = NEW.a1;
      END;
    |
    
    delimiter ;
    
    INSERT INTO test3 (a3) VALUES
      (NULL), (NULL), (NULL), (NULL), (NULL),
      (NULL), (NULL), (NULL), (NULL), (NULL);
    
    INSERT INTO test4 (a4) VALUES
      (0), (0), (0), (0), (0), (0), (0), (0), (0), (0);
    Suppose that you insert the following values into table test1 as shown here:
    mysql> INSERT INTO test1 VALUES 
        -> (1), (3), (1), (7), (1), (8), (4), (4);
    Query OK, 8 rows affected (0.01 sec)
    Records: 8  Duplicates: 0  Warnings: 0
    
    As a result, the data in the four tables will be as follows:
    mysql> SELECT * FROM test1;
    +------+
    | a1   |
    +------+
    |    1 |
    |    3 |
    |    1 |
    |    7 |
    |    1 |
    |    8 |
    |    4 |
    |    4 |
    +------+
    8 rows in set (0.00 sec)
    
    mysql> SELECT * FROM test2;
    +------+
    | a2   |
    +------+
    |    1 |
    |    3 |
    |    1 |
    |    7 |
    |    1 |
    |    8 |
    |    4 |
    |    4 |
    +------+
    8 rows in set (0.00 sec)
    
    mysql> SELECT * FROM test3;
    +----+
    | a3 |
    +----+
    |  2 |
    |  5 |
    |  6 |
    |  9 |
    | 10 |
    +----+
    5 rows in set (0.00 sec)
    
    mysql> SELECT * FROM test4;
    +----+------+
    | a4 | b4   |
    +----+------+
    |  1 |    3 |
    |  2 |    0 |
    |  3 |    1 |
    |  4 |    2 |
    |  5 |    0 |
    |  6 |    0 |
    |  7 |    1 |
    |  8 |    1 |
    |  9 |    0 |
    | 10 |    0 |
    +----+------+
    10 rows in set (0.00 sec)
     
    Ref :
    Dev MYSQL 
    Sunday, May 13, 2012

    Install MySQL Workbench on Ubuntu 12.04

    Read the Inodesian Version

    Currently there is no pre-built .deb file or repo available to install MySQL Workbench on Ubuntu 12.04.  One will probably appear soon after official release of 12.04 but at the moment it is still in beta so there are a few extra steps to get it working.

    NOTE: Once Ubuntu 12.04 moves out of beta there will probably be a better way of doing this so please check the official MySQL Workbench download page and the official 12.04 repos before attempting this.

    First of all you will need to download the latest MySQL Workbench from here.

    Next you must download a .deb file for libzip1 as it is not available in the 12.04 repos.

    for other architectures go here

    After downloading just open them with the software centre and click install.

    *NEW: The libmysqlclient16 package was removed from the 12.04 repos so you will need to download the old deb files for it:


     Next open a terminal and install the following packages:

    sudo apt-get install libzip1 python-paramiko python-pysqlite2 libctemplate0 libgtkmm-2.4-1c2a libmysqlclient16

    Then cd to the directory where you downloaded the deb file and run:

    sudo dpkg -i mysql-workbench-gpl-5.2.38-1ubu1104-i386.deb

    And that should be it, enjoy!

    Ref :
    setupguides

    Saturday, May 12, 2012

    PHP Sessions

    Read the Indonesian Version

     PHP Sessions


    A PHP session variable is used to store information about, or change settings for a user session. Session variables hold information about one single user, and are available to all pages in one application.

    PHP Session Variables

    When you are working with an application, you open it, do some changes and then you close it. This is much like a Session. The computer knows who you are. It knows when you start the application and when you end. But on the internet there is one problem: the web server does not know who you are and what you do because the HTTP address doesn't maintain state.
    A PHP session solves this problem by allowing you to store user information on the server for later use (i.e. username, shopping items, etc). However, session information is temporary and will be deleted after the user has left the website. If you need a permanent storage you may want to store the data in a database.
    Sessions work by creating a unique id (UID) for each visitor and store variables based on this UID. The UID is either stored in a cookie or is propagated in the URL.

    Starting a PHP Session

    Before you can store user information in your PHP session, you must first start up the session.
    Note: The session_start() function must appear BEFORE the <html> tag:
    
    
    <?php session_start(); ?>
    <html>
    <body>
    
    
    </body>
    </html>
    
    
    The code above will register the user's session with the server, allow you to start saving user information, and assign a UID for that user's session.

    Storing a Session Variable

    The correct way to store and retrieve session variables is to use the PHP $_SESSION variable:
    
    
    <?php
    session_start();
    // store session data
    $_SESSION['views']=1;
    ?>
     
    <html>
    <body>
     
    <?php
    //retrieve session data
    echo "Pageviews=". $_SESSION['views'];
    ?>
    
    </body>
    </html>
    
    
    Output:


    Pageviews=1

    In the example below, we create a simple page-views counter. The isset() function checks if the "views" variable has already been set. If "views" has been set, we can increment our counter. If "views" doesn't exist, we create a "views" variable, and set it to 1:
    
    
    <?php
    session_start();
     
    if(isset($_SESSION['views']))
       $_SESSION['views']=$_SESSION['views']+1;
    else
       $_SESSION['views']=1;
    echo "Views=". $_SESSION['views'];
    ?>


    Destroying a Session

    If you wish to delete some session data, you can use the unset() or the session_destroy() function. The unset() function is used to free the specified session variable:
    
    
    <?php
    unset($_SESSION['views']);
    ?>
    
    
    You can also completely destroy the session by calling the session_destroy() function:
    
    
    <?php
    session_destroy();
    ?>
    
    
    Note: session_destroy() will reset your session and you will lose all your stored session data.

    Ref :
    W3school

    Friday, May 11, 2012

    Login two user account using firefox

    When we have several different accounts of email, twitter, facebook and etc. And We wanna login at the same time with firefox. We must create a new user profile in mozila firefox. There are two ways to do it
    1. Using the manual method with RUN
    2. Do like this.
      • Click Start Menu => Select Run or use the shortcut "CTRL + R"
      • Type "firefox.exe -p -no-remote" And then click "OK", so it will open new dialog box "Firefox -Choose User Profile".
      • Next click Create Profile, follow the steps to finish.
      • If you have finish create the user profile, you can use that to login with another accounts.
      • To add another Firefox user profile, simply repeat the steps above, depending on how many users Firefox do you want.
      • That's the way login with 2 diferrent account at the same time Using Firefox. With this we really have 2 firefox with a different setting. Automatic the new profile is using the default setting
      • Original link : calovision


    3. Using Multifox
      • Multifox is a Firefox extension that lets user log on to the web using different account at the same time.
      • Click this link to get multifox

    Thursday, May 10, 2012

    Set Post Align Justify Automatically

    In the standard template of blogger. Post that we'll make automatic align left, to make posts align Justify we have to set it every time we make a new post. It's quite complicated because it takes time. Well to make a post on your blog automatic align justify, simply by adding a CSS trick in the HTML template of your blog.

    Follow the tips.

    First let me tell, themes that I use is a standard blogger themes, then Find the code below.
    .post-body { line-height: 1.4; position: relative; }
    and then add the following code.
    text-align: justify;
    so that becomes like this
    .post-body {line-height: 1.4;position: relative;text-align: justify;}
    *** Good Luck ***

    Wednesday, May 9, 2012

    Upgrade IDMcc Add Ons for Mozila Firefox

    Read The Indonesian Version
    Latest update of Mozilla Firefox has many additional features, but this update makes some addons not support. For example, Internet Download Manager (IDM CC) is an extension that allows the IDM to auto capture streaming video when the play button is clicked or audio streaming when the play button is clicked. To re-enable this feature on the new version of mozilla firefox. IDM CC is needed upgrade to the latest version. At least that's what I did after reading the article in Largest Indonesian Community (Kaskus), so my Internet Download Manager is running normally again.
    1. To upgrade click the following link idmmzcc.xpi to download the "xpi" file
    2. To install, start firefox and open the “xpi” file: File>Open File
    3. After that follow the process as we're installing on Mozilla Firefox Add Ons.
    ** I Hope This Article Useful **